Brick paths in the garden. Brick paths at their summer cottage
Your own home will be more beautiful and comfortable if you make a brick path with your own hands. Brick is classified as a noble building material. It can be used in different purposes, therefore, it is excellent for arranging paths. It is worth considering that you can combine it with products of different colors, volume and shape. The styling combination also has different variants... So, let's see how to do garden paths made of brick with your own hands.
Brick paths are durable and practical. The material can be laid flat and on the edge.
It is not difficult to do styling yourself if you know all the subtleties of the procedure. In particular, at the very beginning, you should consider that you will need to make a list of tools, and then think about the necessary material.
Brick paths are becoming more and more popular. Spread them out of the material different types - it all depends on the wishes of the customer. For the owner, making a brick path is a very interesting activity, but more often specialists do the work.
Tools and building materials for making a garden path
Of course, brick is needed first. You need to choose it very carefully, paying attention to many nuances, because the quality of the material depends on how durable it will be.

It is worth considering that a simple solid brick is a building material that is completely unsuitable for this venture.
The fact is that if you use this particular brick, then in the near future the path will lose its attractive appearance, as cracks will appear, perhaps the brick will even begin to crumble. So the most suitable option in this case, a brick will become, which is specially designed for laying garden paths, it is called that - sidewalk, but there is another name - paving stones. Its application is simple to explain. This is due to the fact that the material of this type possesses high strength, changes in weather conditions do not affect its appearance. Of course, the purchase of such a brick will cost much more than the purchase of an ordinary one.
Among the necessary material, it is important to purchase not only brick, but in this case you will also need to buy a substrate. It is two-layer, so the first layer will be gravel and the second sand. As for sand, it needs a coarse-grained type, homogeneous mass, without impurities.
The bricks must be pressed into the base slightly, laying is carried out on a cement mortar, but it is also possible on a special sand cushion. And the solution is placed on an already prepared sand base.
However, these building materials are not limited to work. AT this process boards are also needed. Their main purpose is that they must fix the edges of the garden path during its laying.

It is worth preparing well so that the procedure for laying the garden tiles takes place on high level and without wasting precious time.
Therefore, it is very important to think in advance about the tools needed to carry out the work. In particular, the following will be useful:
- shovel;
- rule;
- mallet;
- a special device with which it will turn out to compact the gravel.
Back to the table of contents
Features of the brick laying process
Before moving on to laying bricks, it is necessary to carry out a number of preparatory work... They are very important, as is the styling itself.
It is worth going through each of the stages of the preparatory work, performing them correctly in order to bring closer the moment when the garden path made of brick will delight the owner with its appearance and practicality.
The first stage in this type of work is the site preparation procedure, which was previously selected for laying the garden path. Therefore, before doing anything, you need to decide on the place, as well as the direction in which the garden path will run, as well as choose its length and width.

Then you will need to carry out such work as excavation. In this case, the depth of the trench should be about 40, but not less than 30 cm. This is necessary in order for three layers to fit in it - gravel, then sand and finally a brick. The exact value can only be obtained by calculations in a specific situation.
The final stage in the preparation of the trench can be considered the installation of boards, which are located on the sides. This is so that the trench has clear boundaries, since when laying, a reliable fixation is required at the edges. As for the thickness of the board, it should not be more than 25 cm, and the width - within 30 cm.It is very important not to forget about the other trench, which will pass next to the main one and will be intended for water drainage, since its accumulation is undesirable for integrity garden path.
Comfort in a summer cottage is an important matter. On the ground, we not only work, but also rest. And they are able to decorate any site. But above all, this is a matter of cleanliness and safety (who has never fallen, slipping on soggy ground, does not know what I am talking about)). Therefore, today I want to tell you about 9 popular materials for garden paths, as well as their advantages and disadvantages. If I miss something, write in the comments.
Comfort in the summer cottage- no small matter
Preparatory work
You don't have to be landscape designer or a builder to build beautiful, durable and safe paths on your site. A little information, effort and imagination - and the "dream path" is ready. The only thing, before starting work, I advise you mark tracks, planning their location so that it is convenient to get to any point of the site.Tracks can be straight or winding... Designers know what a winding path can do. But most gardeners prefer not to philosophize and go straight.

Pay special attention to soil preparation... After marking the paths (and this is easiest to do with a cord and pegs), remove the sod with a shovel.

Basically, you need to dig a small trench, the height of which depends on the height of the sand cushion. Yes, in most cases you will need sand, which should not only be poured, but align and tamp... For greater reliability, the bottom of the trench must be covered with gravel or.
Materials for the device of a garden path
When choosing a material, consider relief and design plot. Well, if there is no place for designer "tricks" in your garden, proceed first of operational properties materialwhich I will discuss below.1. Natural stone
A colorful and noble material that will fit well into any landscape style. But in our gardens, it is not so common. Which one can be used to arrange a garden path? Most different. Of expensive breeds - basalt, granite, porphyry and marble... More affordable - sandstone and limestone... All of them differ in color (gray, dark red, greenish gray, black), surface, processing.Can be used rough stonecollected in mountainous areas. And you can take sawn a rock, which in itself is almost a tile. Stone slabs are much easier to lay, but they are also more expensive.
Other breeds are used diabase, gabbro, all kinds of pebbles, tuff, shale and dolomite.

Advantages natural stone:
- durability: it will literally serve for centuries;
- environmental friendliness;
- beauty.

Disadvantages of natural stone:
- heavy weight (physically difficult to do such a path);
- high cost, even if you take simple limestone.
- icing. Alas, an ice crust forms on most rocks in the cold season, and therefore it is not safe to walk along such a path. There is salvation, but not everyone will decide on it. This is the installation of the heating system directly under the track)). Seriously, they do that too.
What you need to know:
- Porous stonese.g. limestone and tuff, absorb moisture, and therefore it is advisable to treat them with a water-repellent solution every 3 years.
- When laying natural stone remember that at least one side must be flat... The trench must be made deep enough so that the stone fits well and the path is smooth. In this case, it is advisable to fill up half the height of the trench with rubble. And already on the compacted rubble, pour sand and lay stones. And don't forget to buy a rubber mallet for laying the stone. However, if the stone is hard, you can get by with a hammer.

2. Wood in a variety of forms
The material is also colorful, but, unfortunately, not as durable as stone. If you don't want to change your garden path every 3-4 seasons, think immediately about treating the track with antiseptic and water-repellent compounds... I think the one that is used for processing is quite suitable.Our market will help you choose the right tool for processing tracks. and compare offers from different online stores.
HUSKY Antiseptic semi-matt HUSKY Siberian marigold 2.7 l
579 rbl
LOOK
OBI
Tikkurila Antiseptic Tikkurila VINHA VVA covering 2.7 l
2 749 rub
LOOK
OBI
HUSKY Antiseptic semi-gloss HUSKY Siberian Oregon 2.7 l
929 rbl
LOOK
OBI
Pinotex Antiseptic Pinotex Ultra colorless 2.7 l
1 929 rub
LOOK
OBI
Wooden garden paths are very different:
- from boards (like a walkway - the simplest and most familiar option);
- from special wooden tiles;
- of wooden cuts ... Very handy, interesting idea... Looks awesome, especially when using saw cuts different sizes and arrange them nicely.

What breeds are best for a garden path? Oak, of course. True, it will not be cheap. Oaks are generally appreciated on the farm. I know old houses that still stand on oak pillars. also does not rot for a long time. Well, if there are none, take any wood you can find). You can even saw down garden trees.
Advantages of wood:
- environmental friendliness;
- beauty;
- variability of solutions. You can think of anything, it would be a fantasy;
- fast drying. Wood is a very warm material, so it thaws quickly in spring and becomes a favorite place for cat sunbathing \u003d))
Disadvantages of a wooden garden path:
- short service life (if it is not oak, larch and similar species).
What you need to know:
- Before laying the same cuts, you can treat with linseed oilbrought to a boil. After drying, this treatment should be repeated again.
- On a sandy pillow, some advise putting plastic wrapat. The wood will not come into contact with the ground and, as a result, will rot less. On the other hand, there is a high probability that moisture will accumulate there. To avoid this, the ground under the future track must be formed in the form of a gentle arch... Then, for sure, water will not accumulate.
- The voids between the cuts can be covered with wood chips, sand, rubble or gravel. To your taste. If you cover it with sand, over time the grass will break through and it will be very beautiful.
- When nailing walkways, leave between the boards small gap... Firstly, the wood will be "distributed" from moisture, and secondly, water will leave in the gap.

3. Special materials for road surfaces
These include processed stone, asphalt, in the end - that is, all those materials that are traditionally used in the construction of roads and sidewalks.The advantages of such materials:
- ease of installation;
- beauty;
- durability: they are not afraid of moisture and temperature changes, they can withstand loads.

Disadvantages:
- high cost (for example, paving stones cost an average of 400 rubles per 1 m²). If the plot is large, such a garden path can "cost a pretty penny."
- it is inconvenient to walk on paving stones on heels (just in case)).
What you need to know:
- Garden paths made of such materials have a finished look only with curbs... Although, if you lay them flush with the ground, you can do without borders.
- Important monitor the adherence of tiles to each other and constantly check with the level, otherwise there is a chance to get a skewed track.
- If you notice any defect (for example, a crack), do not use such a tile, as it will quickly deteriorate in the future.

4. Brick as an alternative to paving stones
quite often used for arranging garden paths. You can combine bricks of different colors, create ornaments, lay them both flat and on the edge.Advantages of a brick garden path:
- beauty;
- strength;
- long service life.

Disadvantages:
- high cost (1 clinker brick costs an average of 30-40 rubles)
What is important to know:
- It is better to lay a brick garden path for solution... Sand is also possible, but there is a possibility that one day the bricks will simply break apart.
- In any case, the bricks for the curbs should be placed on the mortar.
- On the sides of the path, at the junction with the lawn, you can drive in a board. It will additionally keep the track from "scattering". This technique is applicable to the device of any garden path.
- Not every brick will work, but only clinker... It is more expensive, but more durable than construction. Construction will quickly crumble.
5. Concrete
Actually, why not?
Advantages of a concrete garden path:
- strength and durability;
- resistance to humidity and temperature changes;
- the possibility of subsequent laying on concrete base tiles or stone.
What you need to know:
- The more cement in the mortar, the stronger the track. Optimal ratio: 1:2:3 (cement, sand and crushed stone, respectively).
- Formwork from the boards around the edges obligatory... Otherwise, the solution will spread.
- There is an interesting solution for decoration concrete walkway: While the concrete is not frozen, pin the colored glass and press the large glass into the surface. A very nice ornament can turn out. Likewise, you can use pebbles, small pebbles.

6. Gravel
Excellent material for creating winding paths. There is no need to check and align anything. It is enough to pour and tamp. This is the so-called bulk track. also, by the way, is different. You can use expanded clay gravel or any other, stone chips, crushed stone, etc.Benefits of gravel:
- cheapness ("Kamaz" gravel costs about 1.5 thousand rubles). Correction: the price depends on the region, type of gravel, fraction, tonnage, in the end ... and depending on who you buy from)). On average, they ask for from 500 to 700 rubles per ton. There are prices and higher. But there is also below. Ideally: buy Kamaz together with neighbors. So that excess gravel does not lie near the house and it is not expensive.
- environmental friendliness;
- simplicity and speed of installation;
- decorativeness.

Disadvantages of gravel:
- Does not withstand heavy loads. But for hiking it is quite suitable.
- Gradually overgrows, "grows" into the ground and becomes clogged. Such a path cannot be swept, for example.
- It's still not very comfortable to walk on it. Especially at first, when the gravel has not yet been compacted completely.
What you need to know:
- Before filling the gravel, work the soil so that the path is not overgrown with weeds (for the same purposes, use agrofibre or plastic wrap).
- If you do not carry out processing, the path will periodically need weeding.
- We'll have to add new gravel.
- Without borders, such a path will become shapeless. In addition, very soon gravel will be lying all over the site (especially if there are children)

7. Plastic
And wherever this material is not used! It turns out that in the store you can buy a special plastic tiles for a garden path. Any color, shape, etc.The advantages of plastic:
- does not rot;
- easy to install (as a rule, special decks are easily fastened to each other);
- most available different colors, shapes, sizes, etc. And the plastic track can be quite pretty;
- light.
Disadvantages of plastic:
- does not withstand heavy loads;
- fading in the sun;
- it wears out rather quickly, although plastic is also different;
- cannot boast of special aesthetics.
What you need to know:
No special installation instructions plastic tracks no. And if there is - read on the packaging when buying.Interestingly, there is even a special plastic paving slabs ... Do you know how it is installed? Sticks into the ground! Perfect option for arranging temporary paths, for example, during the spring crossroads. And not temporary either.

Plastic modular coverage for garden paths. Photo from the site alm-faza.ru
And here is a funny example of a garden path
This issue can be easily resolved using a common material such as brick. As a sidewalk covering, it is attractive in that brick paths can be made with your own hands and at the same time you can use those remnants that were not previously consumed during construction.
Advantages, disadvantages and types used
The main advantages of using bricks for paving footpaths are ease of installation, accessibility and the possibility of using the remains after building a house, including broken fragments.
However, the sidewalk surface covered wall material in the open air, does not differ in durability. Within two to three years, under the influence of moisture and frost, ordinary brick can collapse. To avoid this, you can recommend:
- treat stones or with waterproof varnish;
- use special clinker bricks;
- buy imitation paving slabs.
The treatment of ordinary clay brick with a hydrophobic composition should be carried out at least twice with its full immersion in liquid. This will ensure the resistance of the brick to moisture and increase its frost resistance.
It should be borne in mind that the period of validity of the water repellent is no more than five years. After this, the surface of the track must be processed again. The service life of the lacquer coating is determined by the intensity of use of the brick track.
Brick path scheme.
Clinker bricks are practically waterproof and therefore hardly degrade over time. It is more expensive than usual, but the garden path from it will be distinguished by its durability and more beautiful appearance.
A DIY brick path can be laid out in the form:
- longitudinal pattern with classic spoon dressing;
- alternation of vertical and horizontal rows;
- Herringbones at an angle of 45 ° or 90 °;
- single or double "braids".
There are more complex patterns, but for DIY styling it is recommended to use these.
 Paving methods.
 Required materials and tools
In addition to brick, you will need sand, medium fraction crushed stone, PC400 cement and non-woven waterproofing material for the construction of the path.
Tool for work:
- bayonet and shovel;
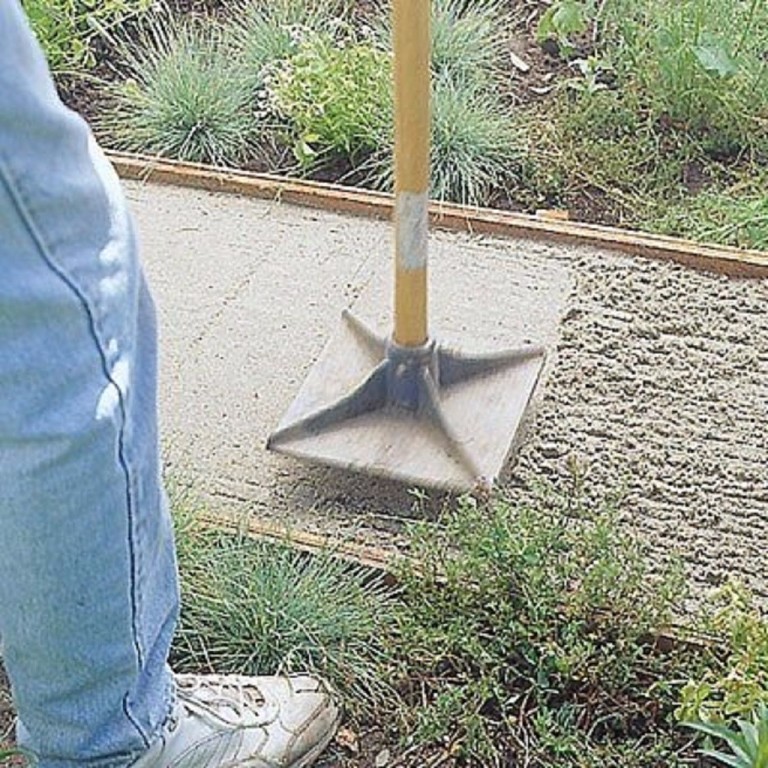
- manual rammer or rammer machine;
- a container for mixing the solution and preparing a cement-sand mixture;
- measuring tape 5-10 m;
- cord for marking;
- pegs;
- rubber and regular hammer;
- construction trowel.
For masonry of broken brick paths, you may need an angle grinder (grinder) with a diamond wheel for processing uneven edges.
Markup
 Marking and excavation.
 Use pegs, a cord and tape measure to mark future tracks and areas. They should be at least two meters away from trees, as growing roots can destroy the foundation. The garden path should be wide enough so that two people can walk on it without leaving the surface.
The cord on the pegs should not sag too much. To do this, make the distance between them no more than 5 meters. It is recommended to make the turns smooth so that the wheelbarrow or trolley can turn on them. In places of turns, increase the number of pegs.
Substrate preparation and curb installation
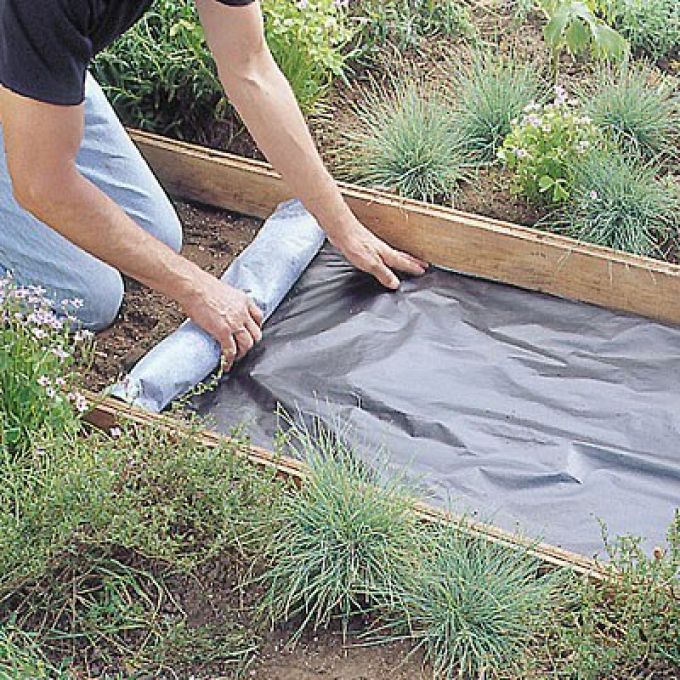
 Geotextile laying.
 To arrange the base of a brick garden path, it is necessary to remove 20-25 cm of surface soil in accordance with the markings. Sprinkle the bottom of the resulting trench with a layer of sand 2-3 cm thick and compact well. After that, lay geotextiles along the entire width and length of the walkway. This will effectively drain moisture downward, preventing it from entering the base. In addition, the nonwoven fabric will exclude the growth weeds through the base and brick covering.
Cover the geotextile with a layer of sand 2-3 cm thick, and 10 cm of crushed stone on it and compact it well. The sand is necessary so that the sharp edges of the stones do not tear the canvas. The crushed stone layer will act as a drain to drain the incoming moisture and prevent the base of the track from being washed away.
 Option using a sandy base.
 The drainage layer must be sprinkled with sand, hiding the rubble and another layer of geotextile put on it. Install a curb along the edges of the path, which can be concrete, or made of bricks laid on the edge. Fastening the curb material is done by hand using cement mortar or steel reinforcement stakes driven into the ground.
Next, pour sand or dry onto the geotextile cement-sand mixture... Tamp the surface well and level it using a plastering rule or a flat wooden block, taking into account the water drainage from the surface after laying. Dry cement-sand mixture provides increased strength and stability of the coating. With light loads on the sidewalk, you can use the base of their clean river sand.
Brick laying
The paving of the garden path is done according to a pre-selected pattern.
 The stones are placed on a sandy or cement-sandy surface, slightly tapping them with a rubber hammer to plant them in place.
 The sagging elements need to be removed and a little sand or mixture should be added under them. Check slopes for water drainage building level, and flat surface plastering rule or wooden block... If a block is used, the alignment can be done by lightly tapping on it.
 After laying the brick, a little dry cement-sand mixture is poured onto its surface, and then it is swept with a brush to fill the joints and the surface is spilled with water.
 After 2-3 days, after the cement in the seams has set, this procedure must be repeated.
Finally
A brick garden path is an affordable solution for do-it-yourself landscaping. However, conventional wall bricks require pretreatment with hydrophobic materials that will protect them from the damaging effects of moisture and frost. If you use clinker bricks, then no preliminary processing of the material is required.
It is very important to make the base of the track correctly - with a drainage layer and geotextile laying. In addition, all layers of the base must be well compacted so that in the future, during operation, subsidence and surface destruction do not form.
With the correct use of the material and adherence to the laying technology, the track made of broken brick can serve not only as a functional element of the suburban exterior. A neatly paved path from waste products allows you to effectively emphasize the style of the garden complex and improve the visual perception of the space.
The key advantages of using a waste construction resource are:
- ease of styling. For paving garden sidewalks and paths from brick fragments, only basic knowledge of working with the material and a simple set of tools are required;
- availability of products. The waste resource allows you to save a considerable amount on the preparation of materials;
- the possibility of recycling construction waste with significant benefits for the budget. That is, there is no need to take out the broken remains of products in order to clear the territory.
Among the disadvantages of using residues of building materials, the need for additional processing to extend the service life is noted. Moreover, this does not apply to clinker bricks, which are distinguished by high performance characteristics.
Brick fight is an excellent material for arranging garden paths
How to use broken brick
When planning how to use broken brick in the country, home craftsmen find interesting solutions, such as:
- paving beautiful garden sidewalks;
- creation of borders;
- decoration of flower beds and high beds.
Also, when deciding how to use broken brick, it is recommended to use recycled material in the construction of gabions and the arrangement of foundations for alpine slides. Most gardeners are fond of decorating tall vegetable beds, the design of which provides for the formation of a powerful drainage layer, where it is also possible to effectively use different-sized fragments of the battle. With the help of waste products, it is easy to build high-quality drainage when planting trees and shrubs.
As experienced tilers note, the use of unsightly material can give quite original results. For example, from a product that is not suitable for construction, you can arrange a path curb by placing the specimens on the edge at an angle of 45 °. To get a unique masterpiece in the form of a garden path with an original masonry pattern, you can organize a composition of battle and a whole brick.
How to make a broken brick track: stages of work
In order for the final result to please with decent decorative and functional characteristics, you should adhere to the technology of paving garden paths.

Planning
When planning a brick path with your own hands, take into account the following points:
- the width of the path is chosen so that two people can walk freely along it;
- the distance between the object being designed and the trees is at least 2 meters, otherwise the growing roots of the plantations over time can lead to the destruction of the base of the structure.

Tools and materials
When building a garden path, you will need the following tools and accessories:
- tape measure, pegs and line for marking;
- shovel - bayonet and shovel;
- ramming tool;
- hammer - rubber and regular;
- usually a trowel, brush;
- container for solution preparation.
To process the uneven edges of broken products, you will need a grinder with a diamond disc.
In addition to the main building material, you should take care of the availability of:
- sand and crushed stone of the middle fraction;
- portland cement grade 400;
- geotextiles.
It is also worth having a garden wheelbarrow on hand for moving materials, a hose for final surface treatment with water.
Foundation preparation
When deciding how to make a road from broken bricks when organizing a summer cottage landscape, the following algorithm for preparing the foundation is performed:
- along the marking line, it is necessary to remove the upper soil with a depth of 20-25 cm;
- sprinkle the trench with a leveling layer of sand 2-3 cm thick and tamp;
- the entire surface of the trench is decorated with geotextiles;
- non-woven fabric is covered with a layer of sand 2-3 cm thick;
- the next is the 10 cm thick crushed stone drainage layer;
- then the drainage is covered with sand and the second layer of geotextile is laid.
It should be borne in mind that a layer of sand between the geotextile and crushed stone helps to prevent deformation of the waterproofing sheet by the sharp edges of the stones.
Curb formation
The perimeter of the trench is drawn with a border. Here you can use a concrete solution or plastic products. It is also important to apply a brick curb, laying it on the edge. Fastening of the curb structure is carried out different ways: with cement mortar, steel reinforcement bars or other convenient means. After the curb is formed, a dry cement-sand mixture is poured onto the geotextile and the composition is leveled, using the rule, taking into account the water flow from the surface.

Brick laying
When paving a garden path, one of the simple masonry options is used, including:
- classic spoon dressing in the form of a longitudinal pattern;
- herringbone pattern at different angles;
- "Braid" single or double;
- alternation of horizontal lines with vertical ones.
Broken brick according to the selected pattern is laid on a prepared cement-sand surface:
- when laying, stones are tapped with a rubber hammer for a better fit;
- sagging specimens must be raised by adding sand under them;
- after laying the material, a little cement-sand mixture is poured onto the surface;
- then, using a brush, the composition for filling the seams is swept.
At the end installation works the surface is spilled with water to seal and set the seams.
Final processing
The last points of installation, including filling the joints with a cement-sand composition and water procedures, must be repeated after 2-3 days, when the cement sets well.
Practical tips for long-term use of a broken brick garden path:
- so that the surface of the sidewalk does not deform under the influence of moisture and temperature changes, the stones are treated with a water repellent or moisture-proof varnish;
- if clay brick is used, before installation, the material is treated 2 times with a hydrophobic composition by completely immersing the product in liquid and drying;
- the period of validity of hydrophobic agents is 5 years, after this period of time it is necessary to re-treat the surface of the sidewalk. The service life of the facility is also affected by the level of operation intensity.
The potential for broken bricks, especially if the material is used in different color solutions, allows you to create interesting compositions, which is confirmed in the works of the masters.
We will tell you a few landscape design tricks, how ordinary garden paths, using optical laws and perspective rules, will help make your summer cottage more beautiful. 
Long brick garden paths will not be so boring and dull when crossed with transverse lines. It can be wooden or concrete beams, brickwork in the perpendicular direction. A combination of slabs and masonry gives the same result. 
If a brick pathway widens near the porch of a house, then it seems shorter, if it narrows, it seems longer. A garden path that widens around the porch creates the effect of a front area in front of the house.
If you want to increase the space of the summer cottage, make paths in the country with a smooth bend. So even the smallest yard will look very impressive. 
Correct forms in landscape design such as circles and squares visually greatly reduce the space. Therefore, try to avoid the correct shapes for garden paths and areas if you have a small garden area. 
You can choose any fashionable design for a path in the garden or area in front of the house, but you must consider two important points - harmony with the main structure and functionality. Walking paths can be narrower, but not less than a meter, and do not require a massive, expensive cushion of gravel and sand. If the area in front of the house is used by you as a driveway, it must be equipped with solid foundationotherwise, the brickwork may warp and crack.
There are several options for paving a garden path with bricks. In any case, first a pillow for the path is prepared: pegs with a cord are driven in along the contour of the path, the soil is taken out, 10-15 cm of crushed stone is poured, the crushed stone is compacted, 3-5 cm of sand is poured on top, on top of which a brick is laid. The joints between the bricks are filled with wet sand, after which the surface of the path is leveled and covered with dry sand. Finally, the excess sand is washed off with water. 
Very beautiful garden paths are obtained from a combination of brick and natural stone. In this version of the paving, the masonry is on skinny concrete. For such a path, it is necessary to make a 1-3% slope away from the building, because the seams in this path will not be able to absorb and channel excess moisture. When laying, a layer of wet concrete is poured onto a prepared gravel-sand cushion, bricks and slabs are laid, the masonry is watered. After that, all the seams on the track are tightly sealed with a special solution. 
However, there is a catch in the method of laying a garden path on concrete: some natural stones react with concrete and over time become covered with sloppy stains. Therefore, with such a choice, consultation with a specialist in natural materials is imperative.
Special clinker bricks for paving garden paths have a beautiful natural shade and allow you to use when laying not only the front side of the brick, but also the side one, creating room for imagination: this is paving with a spiral, squares, beautiful roundings.