Do-it-yourself stove potbelly stove on water. Making the most efficient do-it-yourself stove
The stove in the literal sense of the word saved thousands of people from freezing. Such a device worked flawlessly, but the main drawback was too much fuel consumption. But the installation could be easily done by yourself.
Modern models have some differences:
- Compliance with fire safety requirements.
- Attractive appearance.
- Efficiency in fuel consumption.
Long burning models
The stove a long-burning stove is outwardly reminiscent of ordinary models. But not a single factory is engaged in the production of these devices; they are independently made by masters. In addition, the new metal stove is similar to another “Slobozhanka” furnace, and the difference lies in the way the fuel is burned. As it uses wood sawdust:
- Sawdust or wood chips for a potbelly stove are quite inexpensive, since fuel always remains available.
- If the sawdust is additionally compressed, then they burn out longer, and one load of fuel is enough for 6 to 10 hours of burning.

The potbelly stove has an elongated shape and is made of two cylinders - a small one is placed inside a large one. The easiest option is to take two barrels of 200 and 100 liters. The small container acts as a combustion chamber, and the ash box for cleaning is removed through the hole at the bottom of the large barrel. There are diagrams and descriptions of how to make a potbelly stove with your own hands.

The potbelly stove has an elongated shape and is made of two cylinders - a small one is placed inside a large one.
Air is supplied to the furnace through a round hole located at the bottom of the small cylinder. For full combustion, slightly open the ash box. We recommend that you study the material in more detail and bookmark the article.
From above, the device body must be tightly closed with a lid, and a chimney pipe is mounted on the side between the stiffeners.

The principle of operation of a long-burning stove
The device of a long-burning burner stove does not have any tricks. It is designed according to the following scheme:
- A cone is placed vertically through the open lid at the top of the stove.
- The combustion chamber is filled to the brim with sawdust, which is then tightly packed.
- The cone can be removed, close the lid and start ignition.
- For ignition, wood chips, fine wood are placed in the ash box and set on fire. The box should not be pushed to the end - this will leave a gap for air circulation.
- The chimney creates a draft that helps the sawdust smolder, and the stove starts to work.
- Combustion products after leaving the furnace, heat the walls of the stove and get out through the pipe. This method of heating the room makes it possible to obtain from flue gas up to 40-50% of heat, that is, a device with high efficiency, and the duration of one combustion reaches 10 hours.

Rules for the manufacture of potbelly stoves
Before starting the assembly, all the necessary tools and materials should be prepared in advance:
- inverter welding machine;
- a grinder equipped with metal cutting wheels;
- drill;
- square with tape measure;
- other locksmith tools.
Video: barrel long-burning furnace
The easiest way to make a potbelly stove is to take metal barrels as a basis. The top should be carefully cut off from each, and metal handles and locking mechanisms for tight contact with the lid should be attached to the resulting part by welding.
Advice! Before proceeding with assembly, both barrels should be washed well, as when heated, caustic smoke with an unpleasant odor may start to come out, depending on the previous contents of the containers.
Assembly steps
- In the lower part of the large barrel, a rectangular opening of size 25 by 10 cm is made - a drawer is subsequently mounted there.
- Two guides from a corner are attached to the bottom of the barrel, the dimensions of which are 2.5 by 2.5 cm.
- Under the inner diameter of the container, a pallet 1 - 2 cm thick is cut out of a metal sheet. In a potbelly stove, it will become a support for the combustion chamber and isolates it from the ash pan.
- A hole with a diameter of 6 cm is cut in the center of the resulting pallet and at the bottom of the small barrel. Next, the pallet is welded or placed on a stand of steel supports so that the distance from the bottom of the tank is at least 15 cm.
- Before final assembly, a hole for the flue pipe should be cut in the barrel body. In order to be able to track and change the intensity of combustion, a damper with a handle is built into the nozzle.

- At the end of the work, a small container is installed inside a large one, so that all the holes in them coincide.

Advice! A firebox made from an ordinary barrel will not last long, therefore it is possible to produce long-burning stoves with sawdust thanks to the use of pipes of suitable diameter for equipping the combustion chamber.
- The final stage of assembly of the structure is the formation of a cone for loading fuel 1.5 meters long. It can be made of wood or metal. Regardless of the material, the bottom of the cone should fit well through the round hole in the pan.
Brick the stove
- Before proceeding with bricking, it is necessary to check the strength of the floor. If there is no foundation on a floor made of wood, you can install a stove weighing up to 800 kg, provided it is in good condition. Under a potbelly stove a sheet of metal is necessarily put.

- A sheet of steel, equipped with a substrate of their asbestos cement, is attached to the walls of the room near the furnace.
- Between the masonry of the furnace and the sheet of metal on the wall, a gap of 3-5 cm should be left. During heating, the metal will heat up more than the brick and expand, therefore, with a dense arrangement, the stove may subsequently collapse. And the free space also helps the air convection process.

- Immediately before the start of the masonry, marking is carried out taking into account the gap. The outer boundary of the furnace is marked and the first row should be continuous. The next row necessarily contains 1 - 2 holes in accordance with the size of the stove. Other rows are made according to the principle of the first row.
- The external wall of the device is clad for ease of use - the door should close tightly.
- A metal corner is formed above the door and the upper rows of brick are already located on it.

The outer wall of the potbelly stove is lined for ease of use - the door should close tightly.
- The top of the stove is laid at the discretion of the owner, since in the work plan it does not fulfill any role. The vault can be built as a vault or, conversely, made flat.

How to flood the stove
- To kindle a stove, you first need to remove the lid from it and remove the device through which air enters.
- Next, you can start laying firewood. When stacked vertically, more fuel enters the firebox.

- The top layer is laid with dry chips to increase heat transfer, and a rag or paper moistened with a combustible substance is placed on them.
- Firewood is covered with pancake for organizing air supply and a lid from the stove.
- After opening the damper, a burning rag or paper is thrown into the pipe where the air circulates.
- After firewood fires, the shutter closes completely.

Note! A long burning stove with proper operation can work without adding fuel for longer than 24 hours.
Tips for proper use and care of the device
- Putting a potbelly stove in a living room is not so easy, you should carefully approach this issue. It is forbidden to place the oven too close to the wall or to other supporting structures in the room. It is important to observe a minimum distance of 5-7 cm. It is best to prepare the drawings in advance.

- Before installing the stove on the floor, it is necessary to lay it with a non-combustible material as the basis for a stove. This fire safety rule will help prevent fire if a spark gets on the floor.
- Putting the stove yourself is not too difficult, but you will need to deal with the diagram and instructions. A man can easily master this work.
- You must also remember the rules for handling the chimney. If a potbelly stove works with gas, it is recommended to use a coaxial method for removing carbon monoxide. Provided that the fuel is coal or firewood, a vertical chimney should be built. A coaxial chimney may not be able to cope with the large volume of soot produced by heating wood with sawdust.

- Modern models are able to work on a furnace of different materials. Naturally, the first stove stoves worked only on solid fuel, but the presence of other energy sources in human life played a role and allowed the construction of even more modern units. So, in accordance with the method of operation of the stove, gas burners or special heating elements are installed on it.

The economical potbelly stove is easy to operate and it works on burning sawdust, perfect for heating large rooms. From the master only the desire to build a furnace, time and some professional skills is required. A potbelly stove with high heat output is increasingly becoming an indispensable means of heating, both in cottages and in apartments.
This name is known to all. It is a small-sized design, which is designed to heat the room. Of course, she will not be able to cope with large areas, but as for garages and workshops, she will be able to provide heat. Some models also have a stove top that allows you to make teas or even a small lunch.
This modification of the stoves is easy to do with your own hands, and most importantly, they are made. Why? The fact is that such a design has several advantages:
- the drawing is quite simple, so there are no special problems with the construction;
- there are no special requirements for installation, so installing a potbelly stove is quite simple;
- small dimensions allow you to freely place the stove in almost any room;
- there are no special requirements for fuel, therefore, not so much money will be needed for refueling;
- the weight of the potbelly stove does not require any specific foundation;
- quick warm-up and space heating;
- to create such a device, not so much material will be required, which will save;
- if the device is equipped with a hob on top, then hot tea or even a minimal lunch will always be at hand;
- the chimney here has the simplest design, which allows you to place the stove even on the second floor or in the recess of the floor.
Such indisputable advantages make it possible to understand why a potbelly stove is so often installed in utility rooms. But to be truly objective it is worth saying that this device also has its weaknesses. Firstly, quick cooling. The stove, as it heats up quickly, just as quickly cools down. Therefore, to maintain constant heat you will need a lot of fuel. Which is the second drawback. Although here you can use the material that has the property to burn or decay for a long time. Secondly, from the point of view of fire hazard, this option is not very safe. Therefore, it is important to observe safety precautions. But with a competent approach, the shortcomings of a potbelly stove are easy to fix in particular operation.

Despite the fact that many stoves of this design in the photographs do not look very attractive, they fully cope with their purpose - heating the room. The main thing is to properly assemble the structure and ensure safe operation.
Making a rectangular stove
From what just do not make bourgeois! The fantasy of craftsmen is not limited. But for those who have never taken up such a design, it is worth starting with a more simplified version - a rectangular potbelly stove. This is the most popular model, which, moreover, is quite easy to assemble.
In order to make a potbelly stove yourself, you will need to prepare the following material and tool:
- plan-drawing - it indicates the dimensions of each element;
- metal sheets - their number depends on the desired size of the stove, the main thing is that the material is not thinner than 4 mm;
- steel corners;
- metal pipe (30 mm);
- pipe (180 mm);
- welding machine.

To create such an option, you will need to follow these steps:
- Metal sheets must first be cleaned and degreased, otherwise the welding machine will not be able to reliably connect them. To do this, you can use an ordinary soap solution or special cleaning agents.
- On the sheet of metal that will serve as the front part, two holes must be cut out - one will serve to collect the ash, and the other will be the door of the firebox. The size of the door should be 3-4 cm smaller than the width of the future potbelly stove. As for the height of the arrangement, it is usually made 1/3 lower than the upper edge. Do not forget that from below there will be another rectangular hole for an ashpit. It is desirable to separate them.
- To make the door you will need a metal of a slightly larger size than the resulting window. To connect the two elements, you can use steel loops. A door must be present on the door, which will allow you to open and close the potbelly stove.
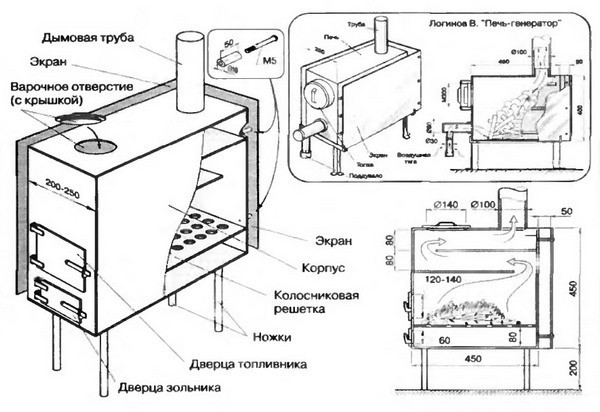
- Now the metal sheets are welded together to form a rectangular box. You should start with the side walls, which are fixed to the bottom. In order to control the vertical and horizontal directions, it is worth using the construction level during such work. Next, the back wall is welded. The internal space is divided into three parts - smoke, firebox and ash pan. Between the last two parts a grate is installed. On the side walls, 10-15 cm are measured and corners are welded on the entire valley. Pre-prepared strips of the same sheet steel with a width of 2.5-3 cm are fixed to them. As for the length, then you need to focus on the available sizes of the potbelly stove. The distance is 5cm. all elements are welded to two rods. Here you need to perform this work as qualitatively as possible, since such strips additionally perform the function of stiffeners.

- The grating itself should not be welded to the walls, because when you need to clean or replace an element in a potbelly stove, you will have to disassemble the entire structure. And that's enough and just pull out the grate.
- Now you need to fix two metal rods in the upper part of the side walls. They will serve as a support for the reflector. It is positioned so that in front there remains a channel through which smoke will leave the potbelly stove. The reflector has to withstand the highest temperatures. Therefore, for its manufacture it is better to choose a metal 1.5 cm thick.
- Now you can proceed to the top cover. Here it is better to make a hole in advance for the future chimney. Next, a jumper is cut out and welded. It will be necessary to make even narrower, which is placed at the level of the grate. It will be she who will separate the grate door and the ash pan.
- Now handles for door, latches and curtains are welded. As for the last elements, then for reliability it is worth using a thick rod and a steel pipe.

- As soon as the design is ready, it is installed on the legs. For such purposes, a metal pipe (diameter 8-10 cm) is perfect, which is cut into pieces of 2-4 cm. A nut with a bolt screwed in is welded to each end. This will provide reliable stability.
- The last stage is the arrangement of the chimney. Here you need a pipe of 15-18 cm in diameter. If we talk about the length, then it should be enough to bring the chimney out. Therefore, in order to avoid overspending of the material, it is worth considering the location of the potbelly stove. Since the chimney implies bends, each such angle should be equal to 45 degrees. A rotary damper is equipped at the lower end. The chimney itself is placed on a sleeve with a height of 15-20cm. For this purpose, use a product with a diameter smaller than the main pipe. For connection use cooking.
After the product is ready, it can be installed and started to operate.

Gas bottle potbelly stove
If you don’t want to tinker with the drawing for a long time, and then assemble the stove from separate pieces, then you can use the old gas cylinder. Its geometric shapes are great for such a product. This stove can then be placed in a garage or even a summer cottage.

All work on the independent manufacture of a potbelly stove has several main stages:
- First, the upper part, where there is a crane, is removed. A plug of the future chimney is welded in its place. Such an element is used to shut off the chimney while the stove is in a cold state.
- By visually dividing the balloon into three parts, a square-shaped hole is cut out in the lowest portion. It will serve to load fuel. The rest of the metal can be adjusted under the door. But for starters, it is scalded around the edges to get the required size. At the same stage, hinges and a handle can be welded to the door. If desired, it is equipped with a lock.
- Several holes are cut through the bottom of the container. They will serve as a grate. To make an ashpit, thinner metal is required. This element is welded in a rectangular shape. Experts recommend that the ash pan be equipped with a door so that the function is simultaneously carried out and blew. Now the box can be welded under the "grate".
- To keep the balloon upright, three supports are welded from the bottom. For such purposes, you can use a pipe or a metal corner.
- The last step is the creation of the chimney. Here the same requirements as for a square-shaped potbelly stove. A thick pipe is welded into the hole and bent at an angle of 45 degrees. It is advisable to bring the end of the chimney to the street or provide the room with good ventilation.
If desired, a frame made of steel reinforcement can be welded to such a potbelly stove and then it will become like a hob.

A gas pot made of gas can also be positioned horizontally. The sequence of work here is similar to that with a vertical position, but only the door is made in the place where the valve was, and the chimney is attached from the end where the bottom of the cylinder is located.
Brick stove
Here, rather, it is not the creation of the potbelly stove itself, but the deliverance of the metal structure from its shortcomings, and in particular from the rapid loss of heat. To do this, it is simply overlaid with a brick.

But in this situation, there is also a drawback - a limited metal has the ability to quickly burn through. Therefore, you can really try to assemble a brick from a brick. Maybe someone will think that this is a violation of the classic version, although this model will warm. BUT! Such a stove is installed once and for all. But this option has a number of advantages:
- it has a risk of fire an order of magnitude lower. Than a metal model;
- the level of efficiency is higher than that of the classic variation;
- brick potbelly stove is safety;
- heat preservation takes much longer than in metal stoves, so the room will be warm for a longer time if the fire goes out.
If the room has a concrete floor, then you do not need to think about the foundation for the stove. In the opposite case, a full foundation is required.
Before laying the stove, the floor is disassembled to form a depression of 40 cm. A layer of sand and gravel is laid at the bottom, which is covered with reinforcing mesh on top. Next, the formwork is installed and concrete is poured. It is advisable to add crushed stone to the solution. The construction of potbelly stoves is started no earlier than 7 days after the foundation is poured. This time is enough for the base to harden.
As soon as the concrete hardens, it is covered with roofing material and sprinkled with sand. The first brick row does not require a bonding mortar. When working, you must definitely use the construction level. A bonding solution is required for the ends. On the second row, the blower door is fixed, and just above it, the grate is fixed.

On the fourth row is the creation of a combustion chamber. They also install the firebox door. To keep this element, use a thick clay mortar and wire, which serves as an additional fastener. There are special holes in the oven door for this.
If a brick potbelly stove is used to heat a large room, then it is better to spread it in 10 rows. For the foundation of the chimney, the brick is laid out in 2-3 rows, and then a pipe is docked to it.
In general, there is nothing complicated in such a product. But it can look much more aesthetic than a metal stove.
Potbelly stove from a barrel
This option is suitable for those who are not particularly concerned about aesthetics, but require only heat. This option is suitable not only for barrels, but also for pipes of very large diameters.
In order to get such a stove, you need to perform the following steps:
- from the outside, two rectangular holes are cut out - the entrance to the furnace compartment and the ash pan;
- “Extra” pieces of the barrel are framed by strips of metal and equipped with a handle with a latch - in the future it will be doors;

- 10 cm down from the furnace hole, corner brackets are welded on the inside of the barrel, on top of which the grate is laid (purchased separately or made independently);
- legs are welded to the bottom from the outside - pipes or metal corners can be used for this;
- then, near the holes and on the doors, hinges are attached and the elements are connected;
- it is recommended to clean all seams at the end, so that the stove looks more accurate and less traumatic;
- as soon as everything is ready, the device can be connected to the chimney, which is previously displayed on the street.
This method of manufacturing a potbelly stove is also excellent for a pipe. Only after the grate is installed, do not forget to brew the bottom of the pipe and the upper part. And so nothing complicated!
In fact, there are many options for how to make a do-it-yourself stove. Sometimes folk craftsmen think of such masterpieces that store designer devices simply can’t even stand nearby. But you need to chase not for beauty and originality, but for safety. Indeed, during the operation of the stove, carbon monoxide will be emitted, which can even poison a person. Therefore, working in a room heated by such a device, once every 30-40 minutes you need to go out into the fresh air and ventilate the space.

Making a stove-potbelly stove is half the battle. We must also enjoy using it. It would seem that this is complicated - threw firewood and bask. But not everything is as simple as it might seem at first glance.
Why are finished devices more expensive? Because the assembly engineers provided all the amenities. In order for a home-made stove to also bring pleasure, it is worth thinking about such moments:
- protection - during the laying of fuel, old coals can fall out, which is quite traumatic, therefore a small grid needs to be built in front of the combustion chamber;
- since the stove is heating up, it is necessary to insulate it a little from the outside, or at least insulate nearby surfaces - this will reduce the risk of fire;

- it is desirable to cover the potbelly stove with heat-resistant paint or an anti-corrosion coating - this way the product will last much longer;
- handles should be attached to the case, since during the burning of fuel, the walls of the device will greatly heat up;
- you definitely need a traction regulator through the wheels - this makes the work of the stove more comfortable;
- if a potbelly stove is made from an old gas cylinder, it is important to make sure that no dangerous substances are left inside the container - in the opposite case there is a high risk of explosion.
Safe operation
Homemade products are always dangerous because, during their construction, a person may lose sight of any details that seem insignificant to him. But in fact, it is they who will be responsible for the trauma of the final product. The same applies to do-it-yourself bourgeois.
In order for a home stove to bring only warmth, it is worth paying attention to the following points:
- the stove should stand on a refractory surface - tiles, masonry, metal sheet of good thickness, etc .;

- if the stove is near the walls, then it is also recommended to protect them - for such purposes you can use the same tile, refractory drywall or any other material that is not afraid of contact with high temperatures;
- there should not be any flammable materials or substances near the appliance - the maximum permissible distance is no closer than 1.5 meters (firefighters generally recommend not to keep such objects indoors);
- since the potbelly stove gathered on its own, it is not safe from the side of the production of harmful substances, so there should be good ventilation in the room (both artificial and natural);
- in the manufacture of the product it is better to choose only high-quality material - at least, such a product will last longer, and at the maximum, it will not bring any harm to its owner.

The service life and quality of heat directly depends on how a person approached the solution of this issue. Therefore, it is better to spend a little money, especially since a couple of sheets of metal will definitely come out cheaper than a full-fledged heater. But the room will be warm and comfortable.
A potbelly stove is an ideal solution in conditions when it is necessary to provide heating for small-sized rooms (garage, utility room, heating a bath), spending a minimum amount of money. This allows you to save the opportunity to use materials that almost everyone has, as well as the simplicity of DIY manufacturing. Next, we will consider what a potbelly stove can be made of and give specific drawings.
What tool is needed?
Regardless of the selected drawing or design features of a potbelly stove, to carry out work on its manufacture, in addition to materials, you need to prepare the following tools and equipment:
- Hammer.
- Bulgarian.
- Welding.
- Drill.
- Drill.
- Brush.
- Chisel.
- Pliers.
- Roulette.
It is understood that each of these tools is designed to work with metals.
Choose a view and get started
Getting started:
- According to the given dimensions, it is necessary to cut out the elements from the sheet from which the furnace will be made. Try to clean the cropped edges as much as possible.
- A part is being prepared for fixing the components of the potbelly stove - a pipe with holes.
- Parts of the upper tank are prepared for the installation of the chimney. To do this, according to the data shown in the drawing, make a hole shifted to the left with respect to the cent. Also, another hole (shifted to the right) is made at the bottom of the tank - it is designed to install a connecting pipe.
- The component parts are welded together and a finished tank is obtained.
- Similarly, the lower tank is welded. Only a hole is made to install the pipe in the center. You also need to make another hole with a slight offset - processing will be poured into it. A special sliding cover is made above the filling hole.
- The lower tank is attached to the upper (they are welded to the connecting pipe). To give structural strength should be using brackets.
- Do not forget to weld the legs to the lower tank.
- To increase the service life, the furnace is cleaned and painted.
Connect the potbelly stove to the chimney and try to heat the garage. To do this, pour fuel into the lower tank and set it on fire. When it has flared up, you need to close the opening for processing with a sliding cover.
Important: Use special heat-resistant paints to paint the structure.
Rectangular wood stove
This option is suitable when you need to heat a garage or bath rooms, designed for relaxation.
Features of the model, the manufacture of which we will describe further with our own hands, consists in large heat transfer and the possibility of adjusting the traction force.
Our furnace will have dimensions 45x45x80. Such dimensions are enough to warm the middle room. Long firewood will fit into it and it is easy to move it.
In this case, we will not give a specific drawing, and try to explain as much as possible in words. Before you start, we buy:
- Steel 3-4 mm thick. A sheet of one and a half to two meters will be enough.
- A piece of pipe. Choose with diameters from 90 to 100 mm. Length: 0.4 m.
- Armature 16 mm. Need exactly 6.2 m.
- Five kilograms of electrodes.
- Four door hinges.
- Steel rod, half a meter long and about 10 mm in diameter.
- Seven meters corner with a 40 mm shelf. The walls should have a thickness of 5 mm.
When everything you need is prepared, we begin work with our own hands in the following sequence:
- Future walls of the structure are cut from sheets.
- The corner is welded in such a way as to make a frame. When doing this and the first point, you need to remember the above dimensions of the stove (45x45x80).
- The fittings are cut and welded to the frame with an interval of 2 cm.
- The finished frame is scalded with tin.
- According to the diameter of a smooth bar in the pipe section, which will be the chimney, 2 holes must be made. The pipe is welded to the frame (before that you need to make a hole under it).
- A curved bar is inserted into the chimney holes. It should be in the form of a right angle. A piece of tin of round shape is welded to it, slightly smaller in size than the inner diameter of the chimney - it will be used for adjustment.
- A potbelly stove should have doors. They are cut directly from the body. Hinges are welded onto the removed piece of metal, with the help of which they are attached to the furnace.
- The doors are equipped with bolts and handles that can be made of any convenient type. The main thing is that they guarantee maximum fixation of the door (if you do not want to burn the garage).
- When the work is finished, you can check the result of the work yourself and start heating the garage.
Important: To ensure traction, the doors are fastened so that there are small gaps.
Potbelly stove from a pipe
This option implies the simplicity of doing the work yourself and an aesthetic appearance, which will allow heating not only the garage, but also small rooms in the country.
Work algorithm:
- The pipe is taken and cut to the desired length.
- 2 holes are cut in the side: for an ash pan and a firebox. The distance between them is approximately 15 cm.
- Cut metal parts will serve as doors. Their size is increased by welding metal strips on top. You also need to immediately install the handles that secure the door.
- Inside the future stove, angle brackets are welded (they will hold the grate, welded with their own hands from the fittings or bought in the store).
- The grate is installed.
- In the circle of metal that will cover the pipe opening (the upper part of the potbelly stove), you need to make a hole for fixing the pipe (chimney).
- The bottom and top of the stove are brewed.
- The pipe is welded.
- Hinges are welded and doors installed.
- The furnace in places of welding joints is cleaned and painted with special paint.
- The last step is to connect to a chimney outside the premises.
If everything is done correctly, a potbelly stove will be able to completely heat a garage or other room of small sizes.
Can Oven
A do-it-yourself stove can be made from any old can. To do this, you need:
- The can.
- A piece of pipe.
- Armature or wire.
Getting started:
- On the can installed in a horizontal position, mark the location of the rectangular basement. It should be placed under the cover.
- Cut a hole for the chimney. It can be in the bottom or wall.
- We make the grate. It is easier to make from steel wire, which is bent into the middle of a future stove and straightened. It is necessary to arrange the zigzag in such a way that it is most convenient to fill the potbelly stove with firewood.
- We attach legs.
- Weld the chimney.
The design implies a minimum of manufacturing costs and you do not need to have professional skills to complete the work. With its help, you can safely heat the garage and other utility rooms.
Gas cylinder stove
If you have a gas cylinder lying around on your site, use it to create a potbelly stove.
Work sequence:
- Cut off the tap and make a hole plug.
- At the bottom, cut a hole for the door. From the obtained piece of the bottom, with the help of its scalding with a strip of metal, the doors are made.
- A lock-handle is attached to the doors and they are mounted on the container using hinges that are welded.
- In that part of the cylinder, which will be the bottom, you need to make a grate. To do this, just make holes.
- A tin box is welded under the holes in the bottom, into which soot and waste will fall. Doors should also be made in front of the box - they will be used to adjust traction.
- The stove must be raised from the ground with the help of legs. For their manufacture, an ordinary pipe is suitable.
- A chimney is welded into the top of the cylinder.
- If necessary, a hob can be arranged on the surface of the structure.
Such an oven will heat a garage or a small house in the country.
A potbelly stove is a fairly simple device for heating rooms. When doing work, remember that the stove must not only heat up, but also meet the minimum fire safety requirements.
Often, homeowners prefer to assemble simple and useful homemade products from improvised and unnecessary materials, instead of buying the finished one. And a potbelly stove is one of such useful devices.
The main feature of the potbelly stove is that it heats up as quickly as it cools. Therefore, the scope of its use is narrowed mainly to those rooms where it is necessary to ensure rapid heating, while the appearance of the device is often completely unimportant for the user.
A do-it-yourself stove can be made, and, if desired, upgraded to achieve more efficient heat transfer.
Have you also thought about assembling such a homemade product and don’t know where to start? We will help you in the implementation of the task - the article discusses the assembly procedure for various versions of the homemade furnace, provides drawings and diagrams.
Also discussed in detail ways to improve a homemade potbelly stove, as a result of which the efficiency of the stove will become noticeably higher.
The choice of furnace design depends on what material is used as fuel. Each user himself determines the degree of its availability and economic feasibility.
It is a combustible material, which has a different temperature and the nature of combustion, dictates the principles of creating various modifications of the device.
The shape of the potbelly stove can be different, often it depends on the availability of suitable material. It can be an old can, a gas cylinder, a metal container - all that is at hand. The main thing when choosing it is the metal thickness and shape, which requires a minimum of alterations.
Image Gallery
At the bottom of the chamber, a grate from the grate is placed (it can be welded from reinforcement), under which ash will accumulate. A hob can also be arranged. It is easier to do this on a horizontally located cylinder by welding corners on it from two sides.

It is good if the barrel initially has legs. If not, you need to weld them or install the oven on bricks.
A gas pot made from a gas cylinder can also be used as the basis for the further construction of a hot water column, as it is also called - "Titan". To do this, a stainless tank is installed over the stove through which the chimney pipe passes.
Water in a wood-burning boiler heats up quickly, and firewood is used little - in the summer one bookmark in a small firebox is enough.
For a potbelly stove, a metal container with walls at least 3 mm thick is also suitable. The open top of the tank is closed with a circle of metal sheet and brewed.
A hole for the chimney is cut out in the lid or wall. Its diameter should be at least 100-150 mm. The top in such a stove will heat up so much that it will be possible to cook food on it, warm the water.
On our site there is also a more detailed instruction with diagrams and drawings for manufacturing.
Features potbelly stove on sawdust
If there is no shortage of sawdust on the farm, then this type of fuel will justify its use. Such a potbelly stove does not require frequent loading - tamped sawdust inside does not burn, they smolder slowly, releasing thermal energy gradually and providing heat for a long time.

A do-it-yourself potbelly stove working on the principle of long burning. A slow combustion process saves resources - heat does not instantly fly out into the pipe, heating the atmosphere
The basis of the furnace can be a metal barrel with an open top (if the container is tight, then the top is cut off) or a pipe with a diameter of 300 to 600 mm.
Then, a metal circle is cut from a sheet with a thickness of three or more millimeters, which should be smaller than the inner diameter of the barrel. In its middle, a hole with a diameter of 100 mm is cut under the cone for ramming sawdust.
The workpiece is welded to the walls of the barrel. With the help of this circle, an ash pan is fenced - in it, with the help of shavings or chips, ignition will be carried out. The height of the ash pan should be 100-200 mm.
A window is cut below the welded circle, which will serve as a blower. Curtains are welded to the cut metal piece, making a door for the same hole.
In the lid of the tank make an exit to the chimney. The lid should fit tightly on the potbelly stove and be from a sufficiently thick sheet, otherwise it will quickly burn out.

In order for sawdust to burn gradually, it is necessary to provide a limited supply of oxygen to the fuel compartment. To do this, a cone-shaped core is inserted inside the firebox, sawdust is poured around it and rammed. The cone is carefully removed, scrolling, the lid is put on the barrel
You can improve the same model by adding an additional cylinder. In this embodiment, the sawdust will be in the inner chamber, and the space between the two compartments will serve to burn gases and increase the heating area. In this embodiment, the exit of flue gases is arranged in the lower part of the stove.
How can you improve a potbelly stove?
An ordinary potbelly stove has a lot of positive qualities, but also has many significant drawbacks. She is unable to accumulate heat and heats the room while the fire is burning. It requires continuous fuel supply, on average - every 30-40 minutes.
In addition, a large amount of heat flies out through the chimney into the atmosphere, without any benefit. That is why work on improving the potbelly stove is ongoing.
The standard design of the stove-potbelly stove has many modernized designs that allow you to:
- save fuel;
- increase the efficiency of the stove;
- increase heat capacity;
- reduce the frequency of fueling.
The most common methods for increasing the efficiency of a potbelly stove are the creation of a slow burning mode, a gas afterburning system, and installation of a heat-resistant lining of internal walls.
You can also improve the quality of the stove by increasing the heat transfer area using welded pipes and an installed fan that will drive air through them.
The industrial model of such a stove is called "Buleryan", but, besides it, there are many more different designs made by artisanal method. We recommend that you look at a detailed home-made workshop.
You can increase the heat transfer time if you overlay the stove with brickwork. Such a stove will heat up more slowly, but also give off heat longer, maintaining the temperature in the room for some time after the fire is extinguished.
Are you interested in masonry? We have a detailed DIY manual with diagrams and drawings on our website.
Option # 1 - furnace with increased fuel tab
This model is designed to increase efficiency and continuous burning time. The basis is a horizontal rectangular potbelly stove on massive, stable legs and is supplemented with a cassette from a deaf sealed cylinder. Such constructive additions significantly increase its effectiveness.
A flange is welded to the cassette cylinder with a height of about 400 mm. After installing the cylinder in the burner hole, its edge should fall 5-10 mm below the stove. To make the cylinder convenient to install and remove, handles are welded to its body.

The cylinder is filled with wood in such a way that there is some space between them and when it is installed on the stove, they can immediately descend on burning coals
How does a potbelly stove work:
- The lower part of the firewood, dropping to the coals of the preliminary ignition, flares up. In this case, the upper part located in the cassette will not burn due to a lack of oxygen, but it will be dried by the action of hot smoke.
- Under the weight of its own mass and as it burns, the firewood gradually sinks into the firebox.
- Hot gas, which has been in the cylinder for some time, gives off heat to it, thereby increasing the heat transfer area in the room. In this case, the cylinder cover can serve as a hob.
- At the same time, the temperature of the outgoing smoke decreases, which means that the heat capacity and efficiency of the stove are increasing.
As a result of such modernization, the time interval between the laying of firewood increases and the efficiency of using the stove increases.
Option # 2 - a long-burning potbelly stove “Bubafonya”
The low efficiency of an ordinary stove is a long-known fact and verified by many users.
One of the methods for increasing it is to slow down the combustion process by restricting the flow of air into the combustion chamber. This improvement can be found in stoves such as Bubafonya, Filipina.
Use this model of potbelly stoves in non-residential premises - workshops, greenhouses, and other outbuildings. To work for 9-12 hours, one bookmark of small firewood, wood chips, sawdust is enough. In this model of a heating device, coarse-chopped and raw firewood cannot be used.
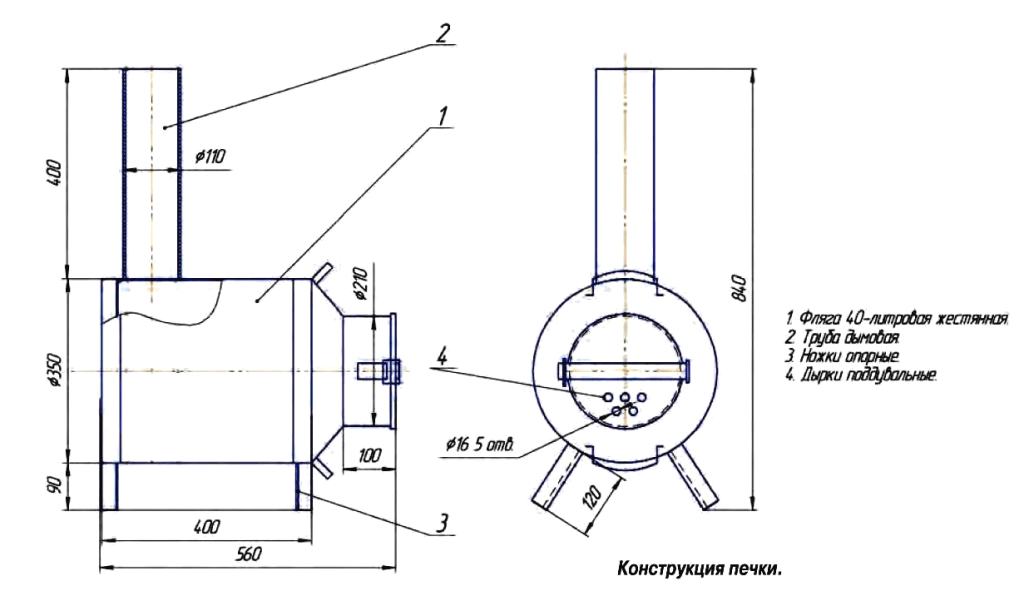
A potbelly stove can be created from any metal tank. Most often use a barrel of fuel and lubricants or an old bottle.
Production is carried out in the following sequence:
- From an available cylindrical tank, a furnace chamber is prepared, in the upper part of which a hole is cut out for the chimney.
- From metal (at least 10 mm in thickness), a circle is cut out, slightly smaller than the inner diameter of the barrel.
- A hole with a diameter of 100-150 mm is made in the center of the circle (the exact size depends on the diameter of the pipe used for the rod).
- On one of the planes of the circle, ribs up to 50 mm high are welded.
- A pipe is welded to the center of the circle. Its length is calculated so that the piston in the lowered state rises above the tank cap by about 100 mm. If you leave the pipe longer than necessary, draft will occur in it, it will start to smoke.
- Next, construct a lid that will fit tightly onto the barrel and cut a hole in it that fits under the piston pipe
You can further increase the efficiency of this model by organizing the intake of air from the street. Thus, the heated air from the room will not fly into the chimney.
Option # 3 - a furnace with secondary afterburning “Philippine”
The furnace used two methods to increase its efficiency, based on the principles of long burning and pyrolysis. For its manufacture, two gas cylinders will be needed, which will serve as chambers for primary and secondary combustion.
The sequence of steps for making a potbelly stove is as follows:
- Cylinders are prepared for work by releasing gas residues from them and filling them with water. Without this procedure, it is categorically impossible to cut them, otherwise the sparks that are formed during the operation of the grinder can provoke a gas explosion, a certain amount of which always remains in the cylinder.
- In the first cylinder, which will serve as a chamber for the furnace and ash pan, remove the tap and cut off the top (it is used to make the door), cut a hole for the installation of the chimney.
- Opposite the chimney hole, a pipe is welded, the other end of which should not abut the cover of the second chamber, leaving free space for smoke to escape.
- A metal ring is welded at the outlet of the pipe from the first cylinder, it will serve as a support for the installation of the upper cylinder. Holes are drilled in it.
- A metal ring is also welded to the second balloon at the top cut-off point, in which places for holes are marked, focusing on the already made holes in the first ring.
- Before finally installing the second cylinder, a pipe for supplying air is inserted into it.
- The upper chamber is put on the pipe, combining the holes, a heat-resistant tourniquet is wound between the rings, the connection is fixed with screws.
- The chimney exit is made from the bottom of the secondary afterburner chamber.
To obtain a stable design, reliable legs are welded to the lower chamber. Install the door to the awnings. It can be further improved by adding the ability to regulate the air entering the furnace.
The device of a potbelly stove is rather simple. When burning combustible material in a confined space with air flow and smoke exhaust, the walls heat up and heat the room. The simplest furnace should have three elements:
- combustion chamber;
- a door with air channels for fresh air;
At the same time, for the most efficient operation of the stove, you need to follow many points:
- aspect ratio of the structure;
- the ability to regulate air flow;
- the correctness of the chimney scheme;
- complete burnout of fuel, etc.
How to make a potbelly stove with your own hands, so much so that you take into account all the necessary points for its most effective work? This requires an accurate heat engineering calculation. You no longer need to carry it out, since the drawings include all the exact dimensions.
Main technical requirements
A potbelly stove is the name of the furnace, implying an accurate heat engineering calculation. Dimensions directly depend on the size of the combustion chamber. If the pipe is too wide and allows all the accumulating gases to pass, then, in addition to smoke, it will go away and warm, as well as a large amount of completely unburnt materials, as a result of which the furnace will not heat up.
The width of the pipe must be such as to create resistance. According to calculations, a number indicating the diameter of the chimney in millimeters should exceed 2.7 times number in liters indicating the volume of the combustion chamber. For example, if the volume of the camera is 25 litersthen the diameter of the chimney should be 65 mm.
How to burn fuel in a potbelly stove
Despite the grilles through which the ash falls to the bottom of the furnace, which is almost cooled, heat is still transferred to the lower part of the tank. Because of this, stoves are usually put on their feet sufficient height according to the drawings, and asbestos is most often laid under the furnace, on top of which a sheet of metal is laid, exceeding the size of the furnace around the perimeter by 35 centimeters, as in the video. The potbelly stove should be located at a distance not less than 1.2 meters from the walls of the room.
Read also: How to install a potbelly stove in a wooden house
The most dangerous part of the furnace considered a chimney. It focuses on the hottest gases that can continue to burn, which is why the chimney is constantly hot, when assembling it, you need to check drawings more often.
Additional modifications
 At present, potbelly stoves can operate on any type of fuel, whether it is solid, liquid or even gaseous. Depending on the type of fuel, grate stoves are added to the design of the stove grilles, blowers, etc.. After watching the video, you can familiarize yourself with many of them, and then find the drawings of any interested person. A furnace capable of burning even coal. When adding guides inside the furnace, the potbelly stove can even be used as a plate for cooking.
If the grates are made removable according to the drawings, then the furnace can have two combustion modes. You can assemble a universal blower with a removable nozzle, and, in this case, it will be possible to use one potbelly stove three different types of fuel depending on the position of the blower and additional parts from different drawings.
Using bourgeois
 When considering heat engineering and fire safety, nothing limits the master in creating a potbelly stove of any kind and any shape. Many Canadian, Finnish, and Swedish industrial manufacturers have wondered how to make attractive potbelly stove, and as a result, they produce such stoves in an amazing performance - with this design they can be placed in country houses as subject interior instead of a fireplace.
By the way, the fireplace in the assembly is more complicated, requires a lot of costs, and also coordination of the drawing of the installation project. When placing a potbelly stove no coordination is required, since such furnaces are not considered a stationary element. As you can see from the video, a lot of masters, and workshops with the help of such stoves, and each homemade potbelly stove has its own scheme.
Read also: Overview of bourgeois stoves, tips for their choice
Varieties of efficient ovens
For you can increase the efficiency of the stove. She holds longer and gives off heat better compared to metal. Water use can be limited only by imagination - you can simply put on top of the potbelly stove a tank with water (and use it for domestic purposes), weld channels or pockets for water to the sides of the structure, completely encircle the furnace and chimney around the perimeter with a metal tube and let water through it, as in the video. The same tubes can be carried out and around the perimeter of the room. For most options, drawings are also available.
Cast Iron Potbelly stoves
Such stoves hold heat for a very long time and are able to work not only on wood, but on everything that burns. Most often, thick-walled stoves used by the military on campaigns. The design is considered the most reliable, it never burns out, due to its "omnivorous" very economical and indispensable for good room heating. But it is not suitable as a stove for boiling water, and it is unlikely that it will be possible to make it at home.
Longest burning
 Engineer Bystrov created a long burning design. Such stoves have a top load, there is no grate. These furnaces are often used in smokehouses, for drying walls, drying clothes for workers. Burning sawdust to complete burnout in a furnace assembled according to this scheme can last 19 hours. Also, a sufficiently long burning can be obtained with using firewood as fuel.
The main difference between a wood-burning stove is that they can operate in two modes, which can be viewed on video. If the room needs to be heated quickly, the ash pan should be extended a few centimeters, opening the gate completely. The second mode is used to save the temperature in the house or in the country in one place with prolonged burning of fuel. In this mode, the wood will burn much more slowly, use very little oxygen and give more heat than with a conventional furnace.